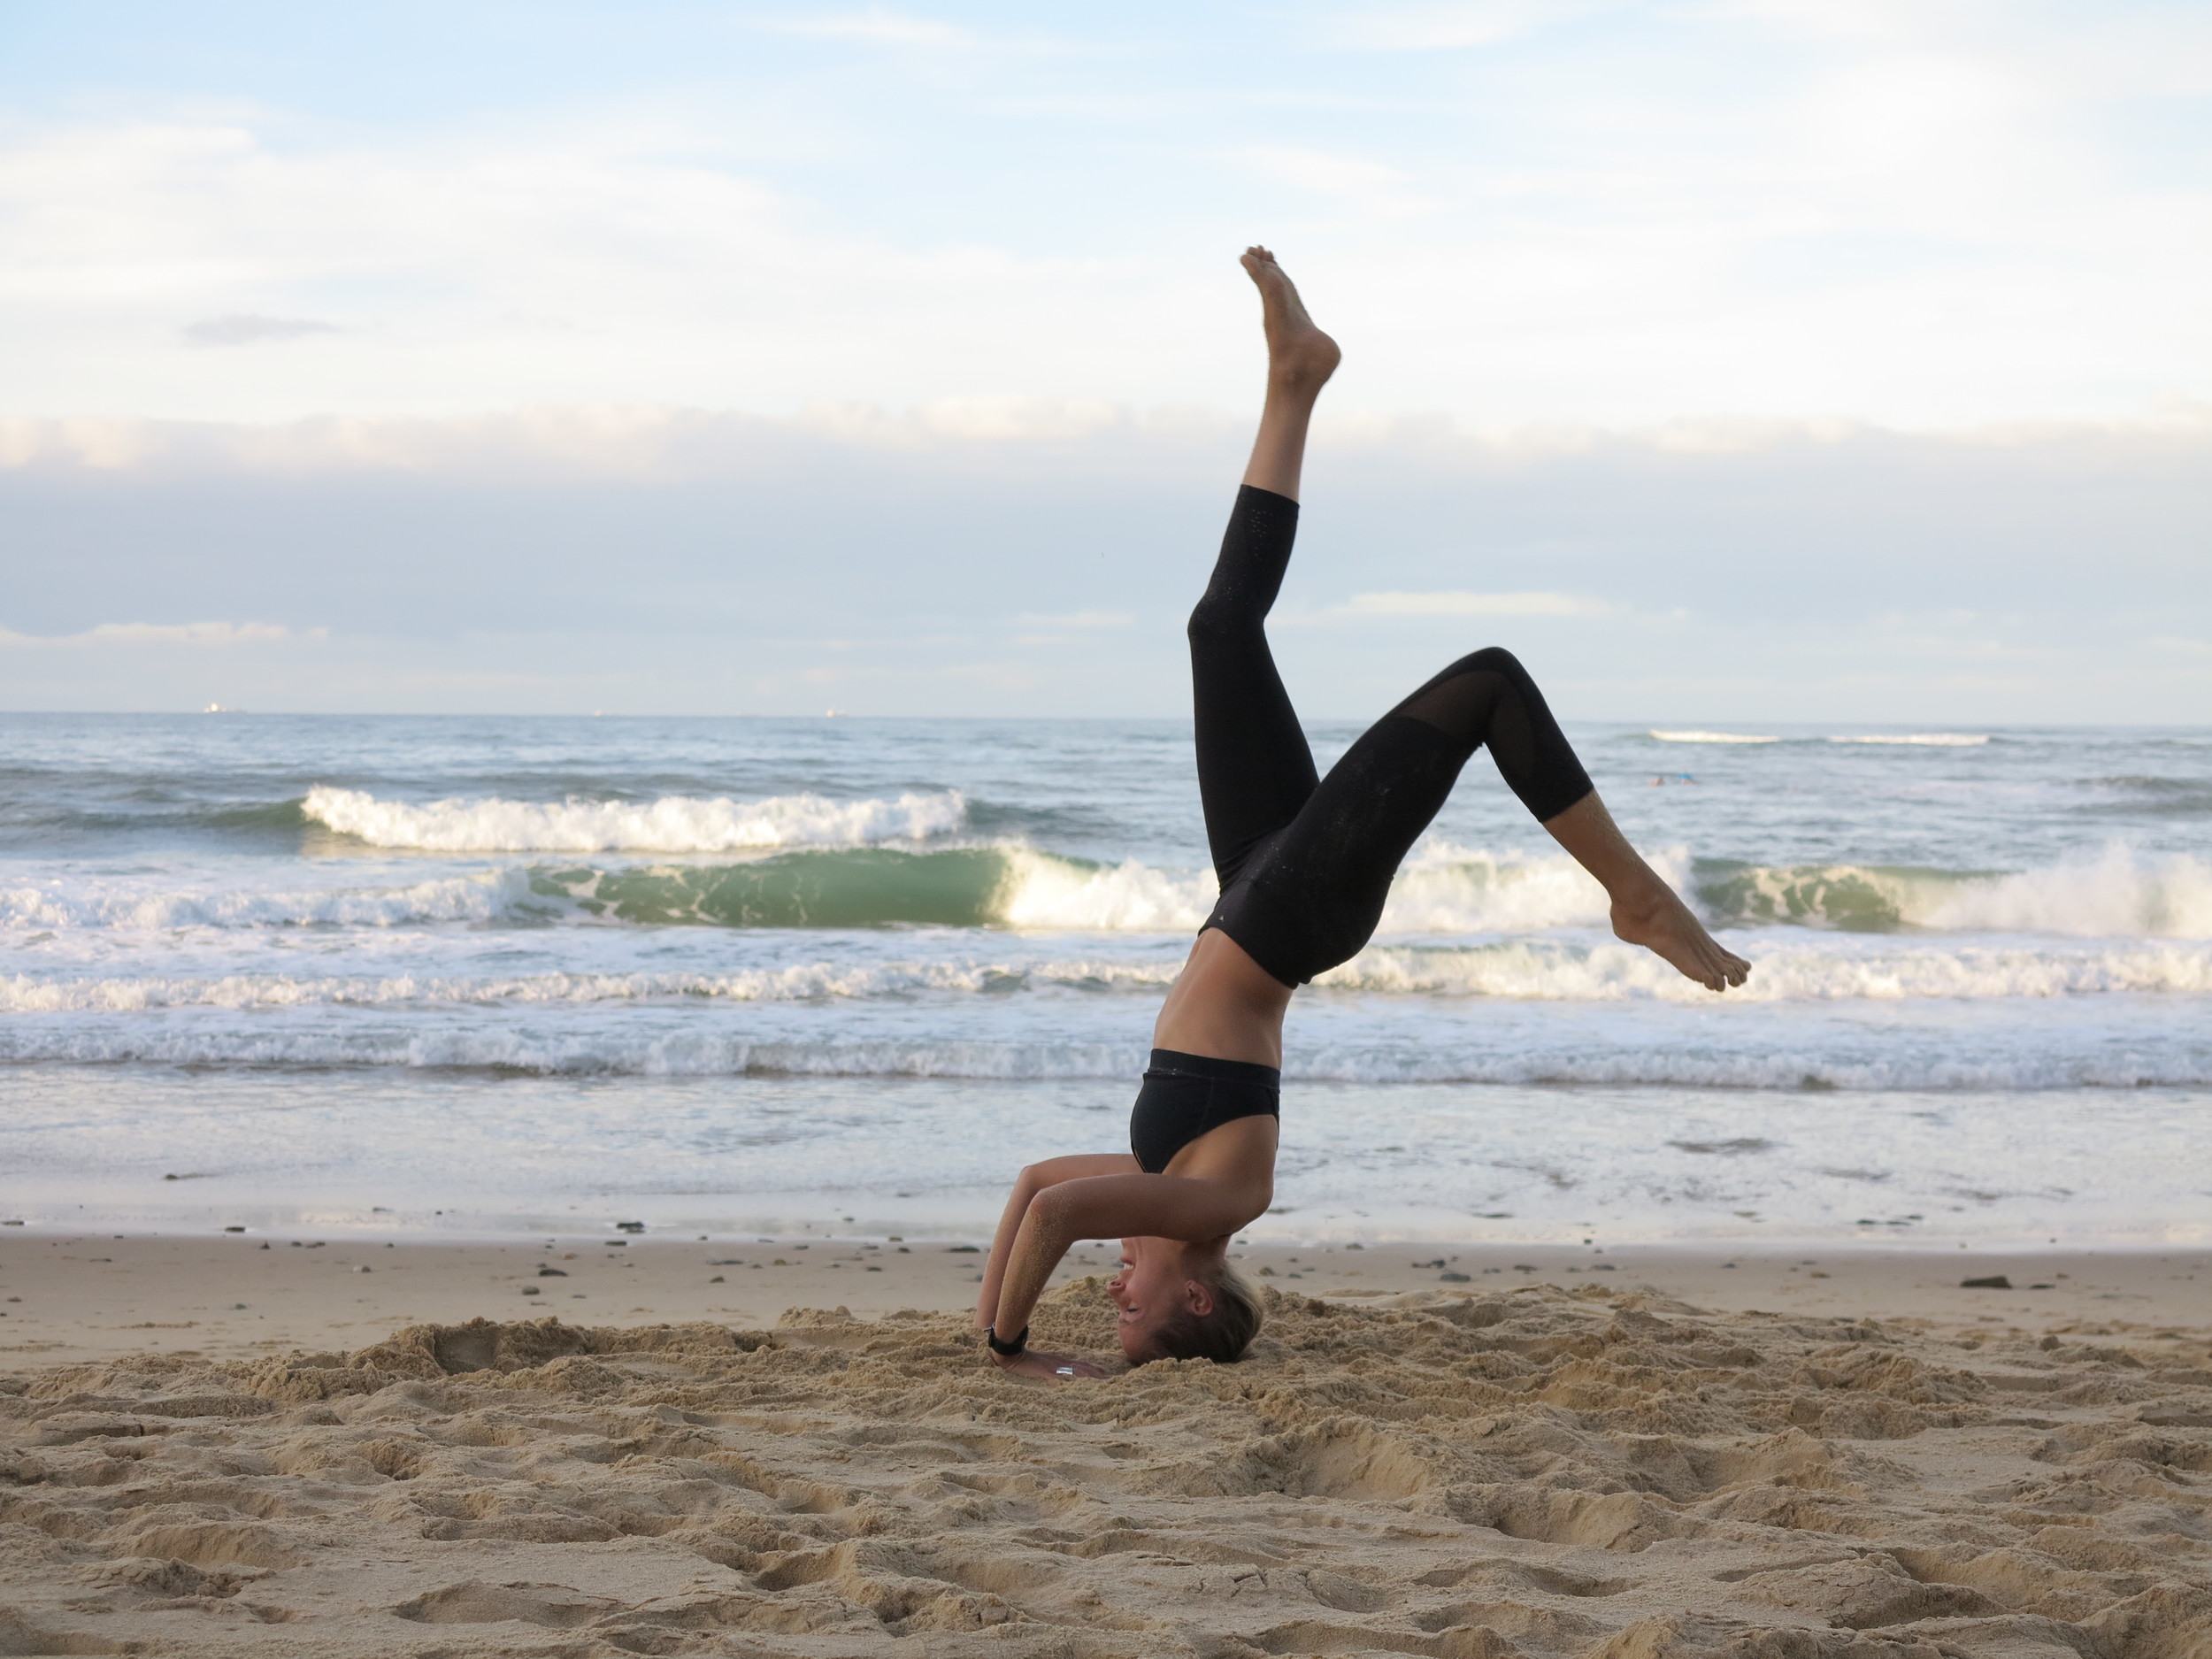
There is something elusive about a headstand or arm balance or any inversion that gets our hearts pumping and shortens our breath. For some it comes naturally but for me it didn’t, it took 12 month of practicing, learning how to fall and get back up and how to let go of my fear in order for me to get where I am today, and I will continue to practice because I believe that I will always be a student in my inversion practice.
But given my plight and my difficulties learning these postures I thought I would share with you 9 key tips for mastering your headstand (and some may be applicable for any pose you find difficult).


1. LET GO OF YOUR FEAR!!
This was a big one for me, after hurting my neck numerous time, falling flat on my back on a paddleboard and smashing into walls and well.. you name it, I finally realised that the biggest thing holding me back from mastering my headstand was the fact that as soon as I felt slightly wobbly, at any point in time during the posture I would over correct myself with a jerk which would inevitably pull me down quicker than if I had of just focussed and let go of my fear.
Simon Parks once told me“it’s important to find tadasana in every pose” (Google Tadasana if you’re not sure which asana it is) and in a headstand it’s simple, it’s a standing pose, but upside down. That might make it seem a bit trivial considering it is named the king of asanas but if you think of it that way it becomes way less scary… well I think so anyway.
2. Set your foundation
I’ve been to a lot of inversion and headstand workshops, and have even run my own with the amazing Libby Hucker and my biggest piece of advice is to know how a headstand works (or any inversion for that matter) and set your foundations accordingly - just like you would for any standing posture.
This means understanding how to use and activate your arms and shoulders, protecting the joint and neck. The weight of your headstand should be predominantly on your forearms, not your head, so if you feel like all of your weight is on your head make sure to readjust. Like every step, practice slowly and notice the difference between placing all of your weight on your head vs. your arms.
Check out my pictures and steps for setting your foundations in your headstand below...
3. Slowly, slowly all is coming
Rushing is not helpful. Trust me. Trying to kick your legs in the air when you haven’t taken the time to feel what’s actually happening will only cause injuries and won't help you to understand what it is that isn't working for you.
When you’ve set your foundations (as per below) and you’ve lifted your hips (Step 6), keep your feet on the ground and practice walking in and walking back out again. Take note of how your body weight shifts over the top of your arms and your head, stop to find your drishti or gaze point (you can look at your toes if they're still on the ground), pull your belly button into your spine and notice if your hips lift a little higher.
Because we are so rarely upside down noticing the subtle movements and intricacies of your body when you are is difficult, it takes practice and patience to get used to the feeling and to be conscious and still, this consciousness is why headstands are so amazing for mind focus and control.
Ultimately, before you move past Step 6 you want to be able to feel every little movement in your body with your feet still on the ground, once you are focussed here it will become much easier to balance with your legs in the air.
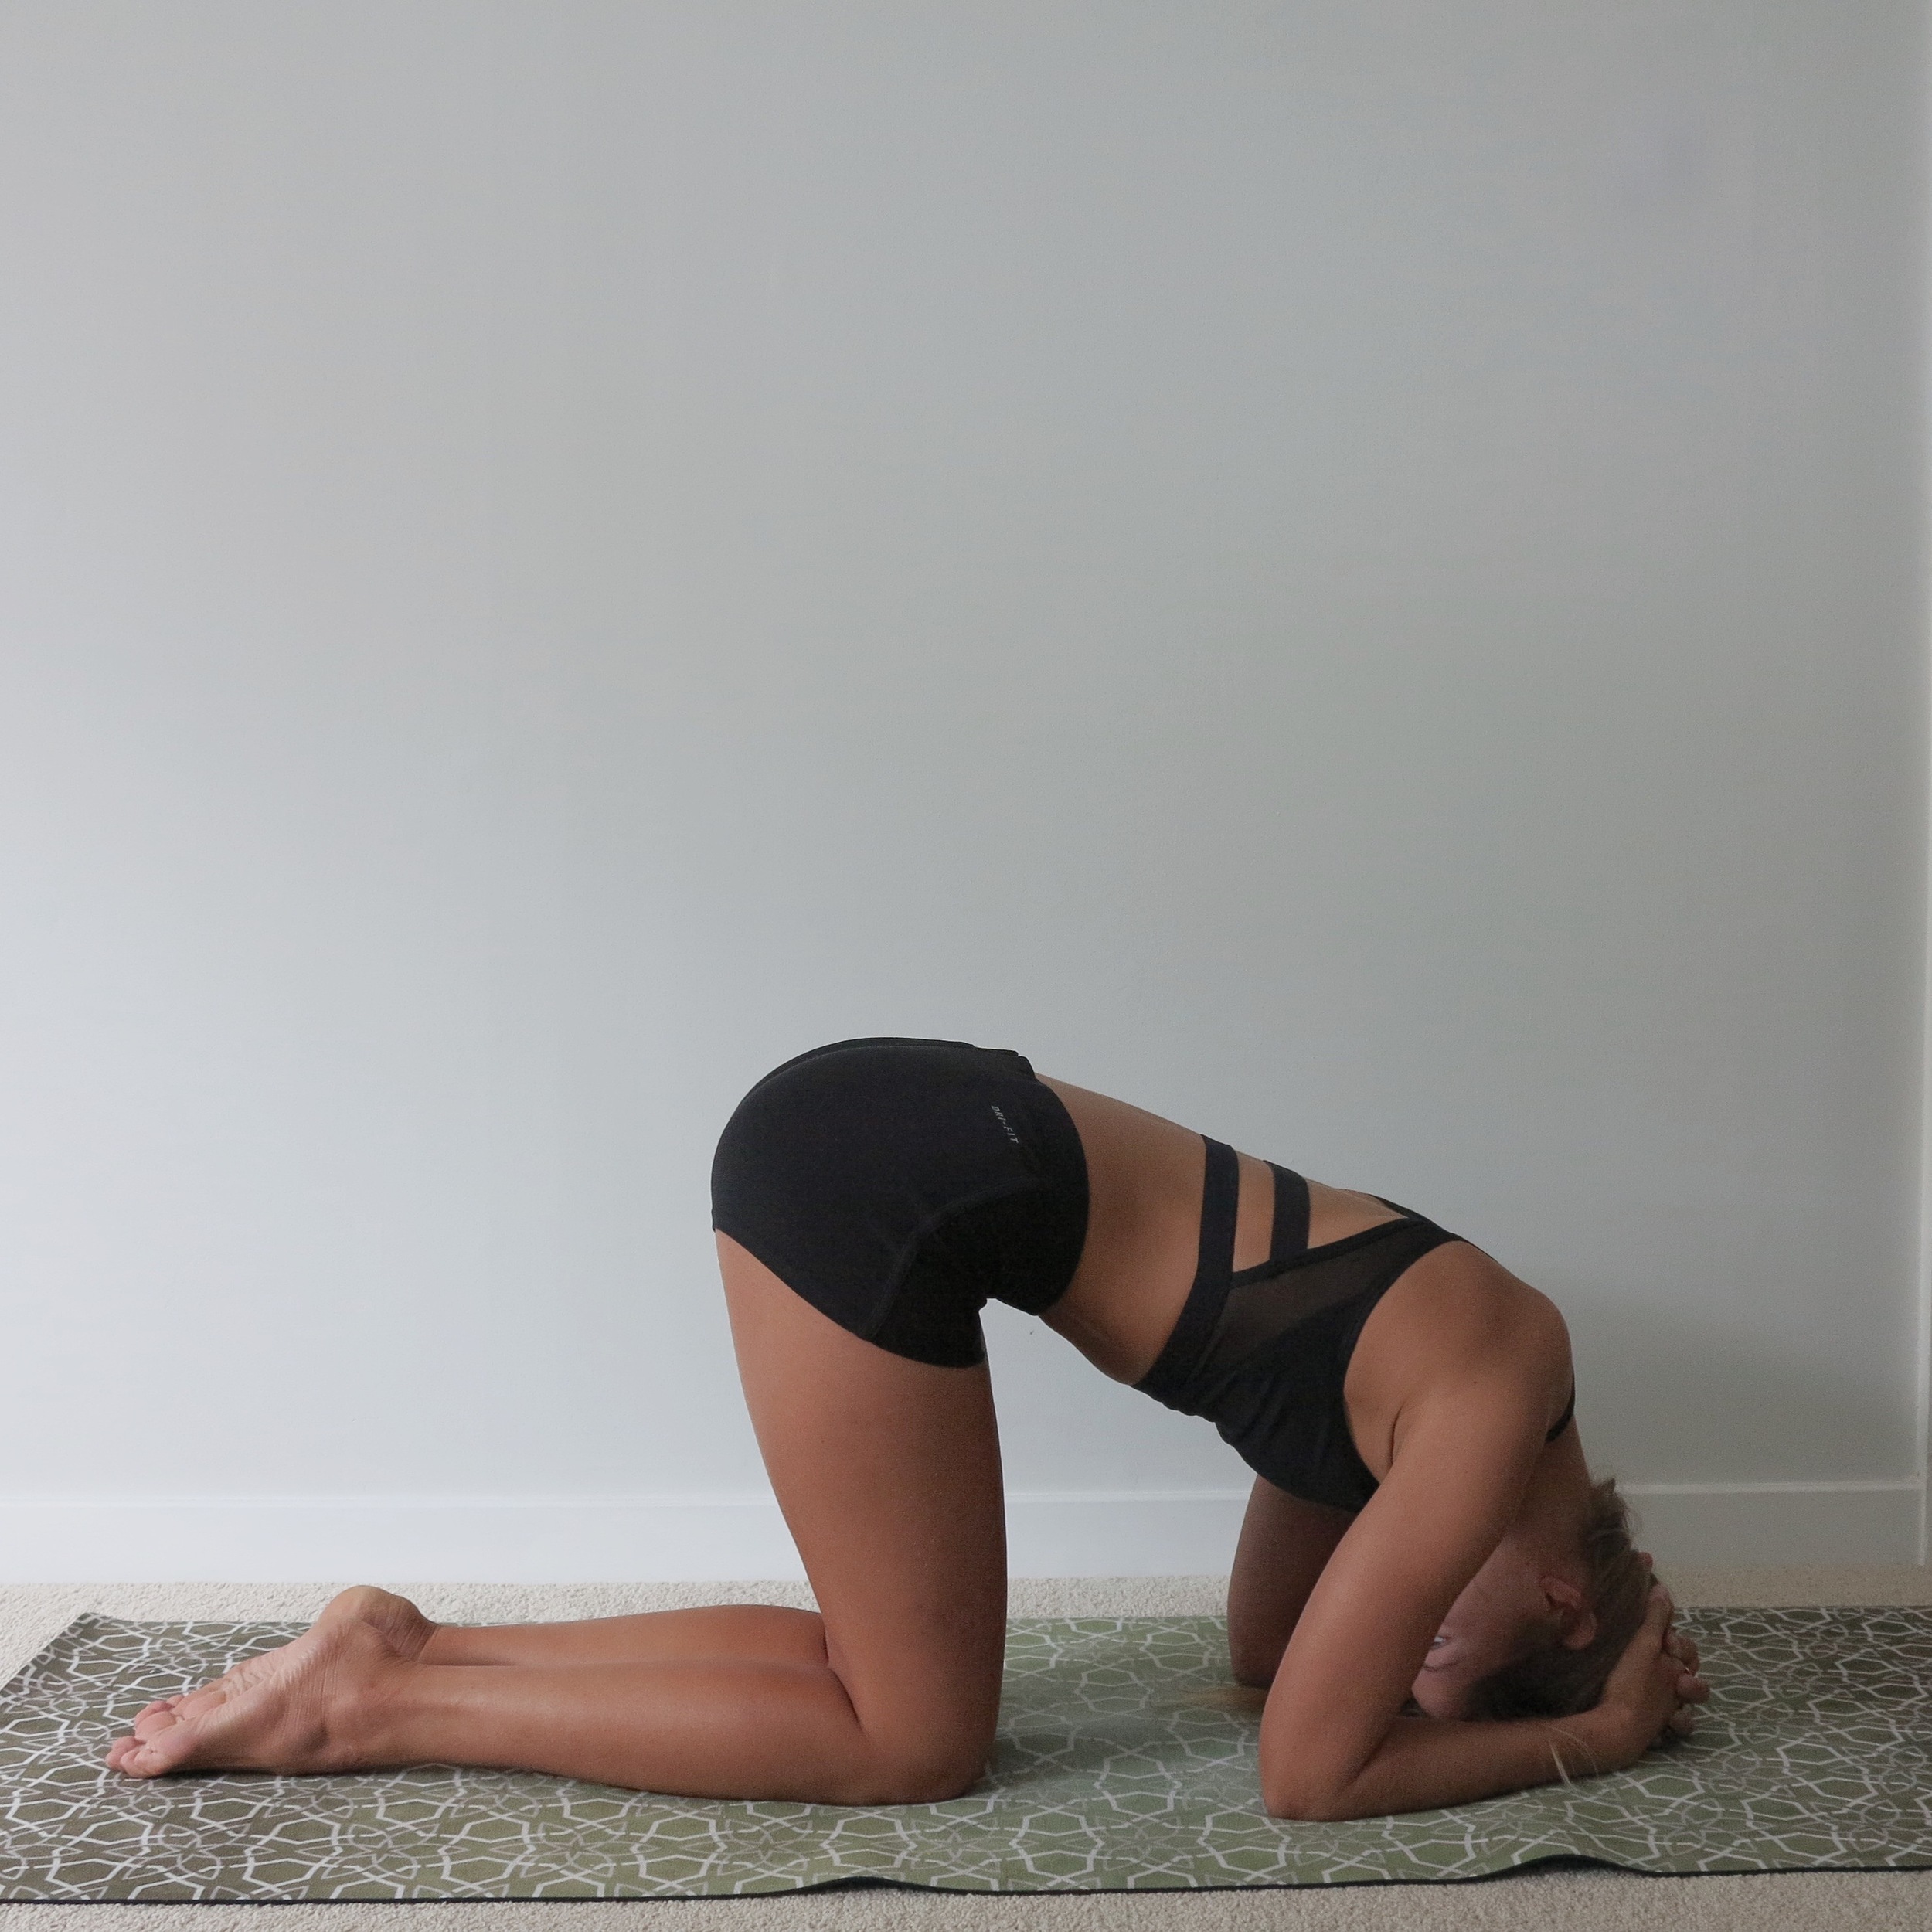
4. Tuck it in
Let your headstand tuck be your best friend. This is the best place to build your ‘core’ strength by tilting your pelvis, pulling your rib cage in and practicing extending your legs parallel to the ground. If you can hold your ‘tuck’ whilst doing all of this then you are on your way to a VERY comfortable headstand practice.
Explore your own strength and range of movement in your tuck, the more comfortable you feel in this part of the pose the easier it will be to extend your levers (legs) into the air.
See my examples below for what I mean by a ‘Headstand Tuck’ in Step 7 and 8 below.
5. Open your eyes
I soon realised as I became more aware of my own body during my inversion practice that whenever I would get my legs in the air, I would struggle to concentrate and would always wonder afterwards what it was that I was looking at. I was too busy visualising my legs being in the air and focussing on lifting through my toes and heels that I forgot my drishti or focus point and would completely blank out every time.
This epiphany was one of the most important in nailing my headstands, because as soon as I remembered to focus on a point in front of me, just like I would in any other standing or balancing posture I found it that much easier to steady and still my body.
Focusing on a point that isn't moving to steady your gaze and your body is also extremely helpful when attempting an inversion on a stand up paddle board too – so you’ll be floating with your legs in the air in no time.
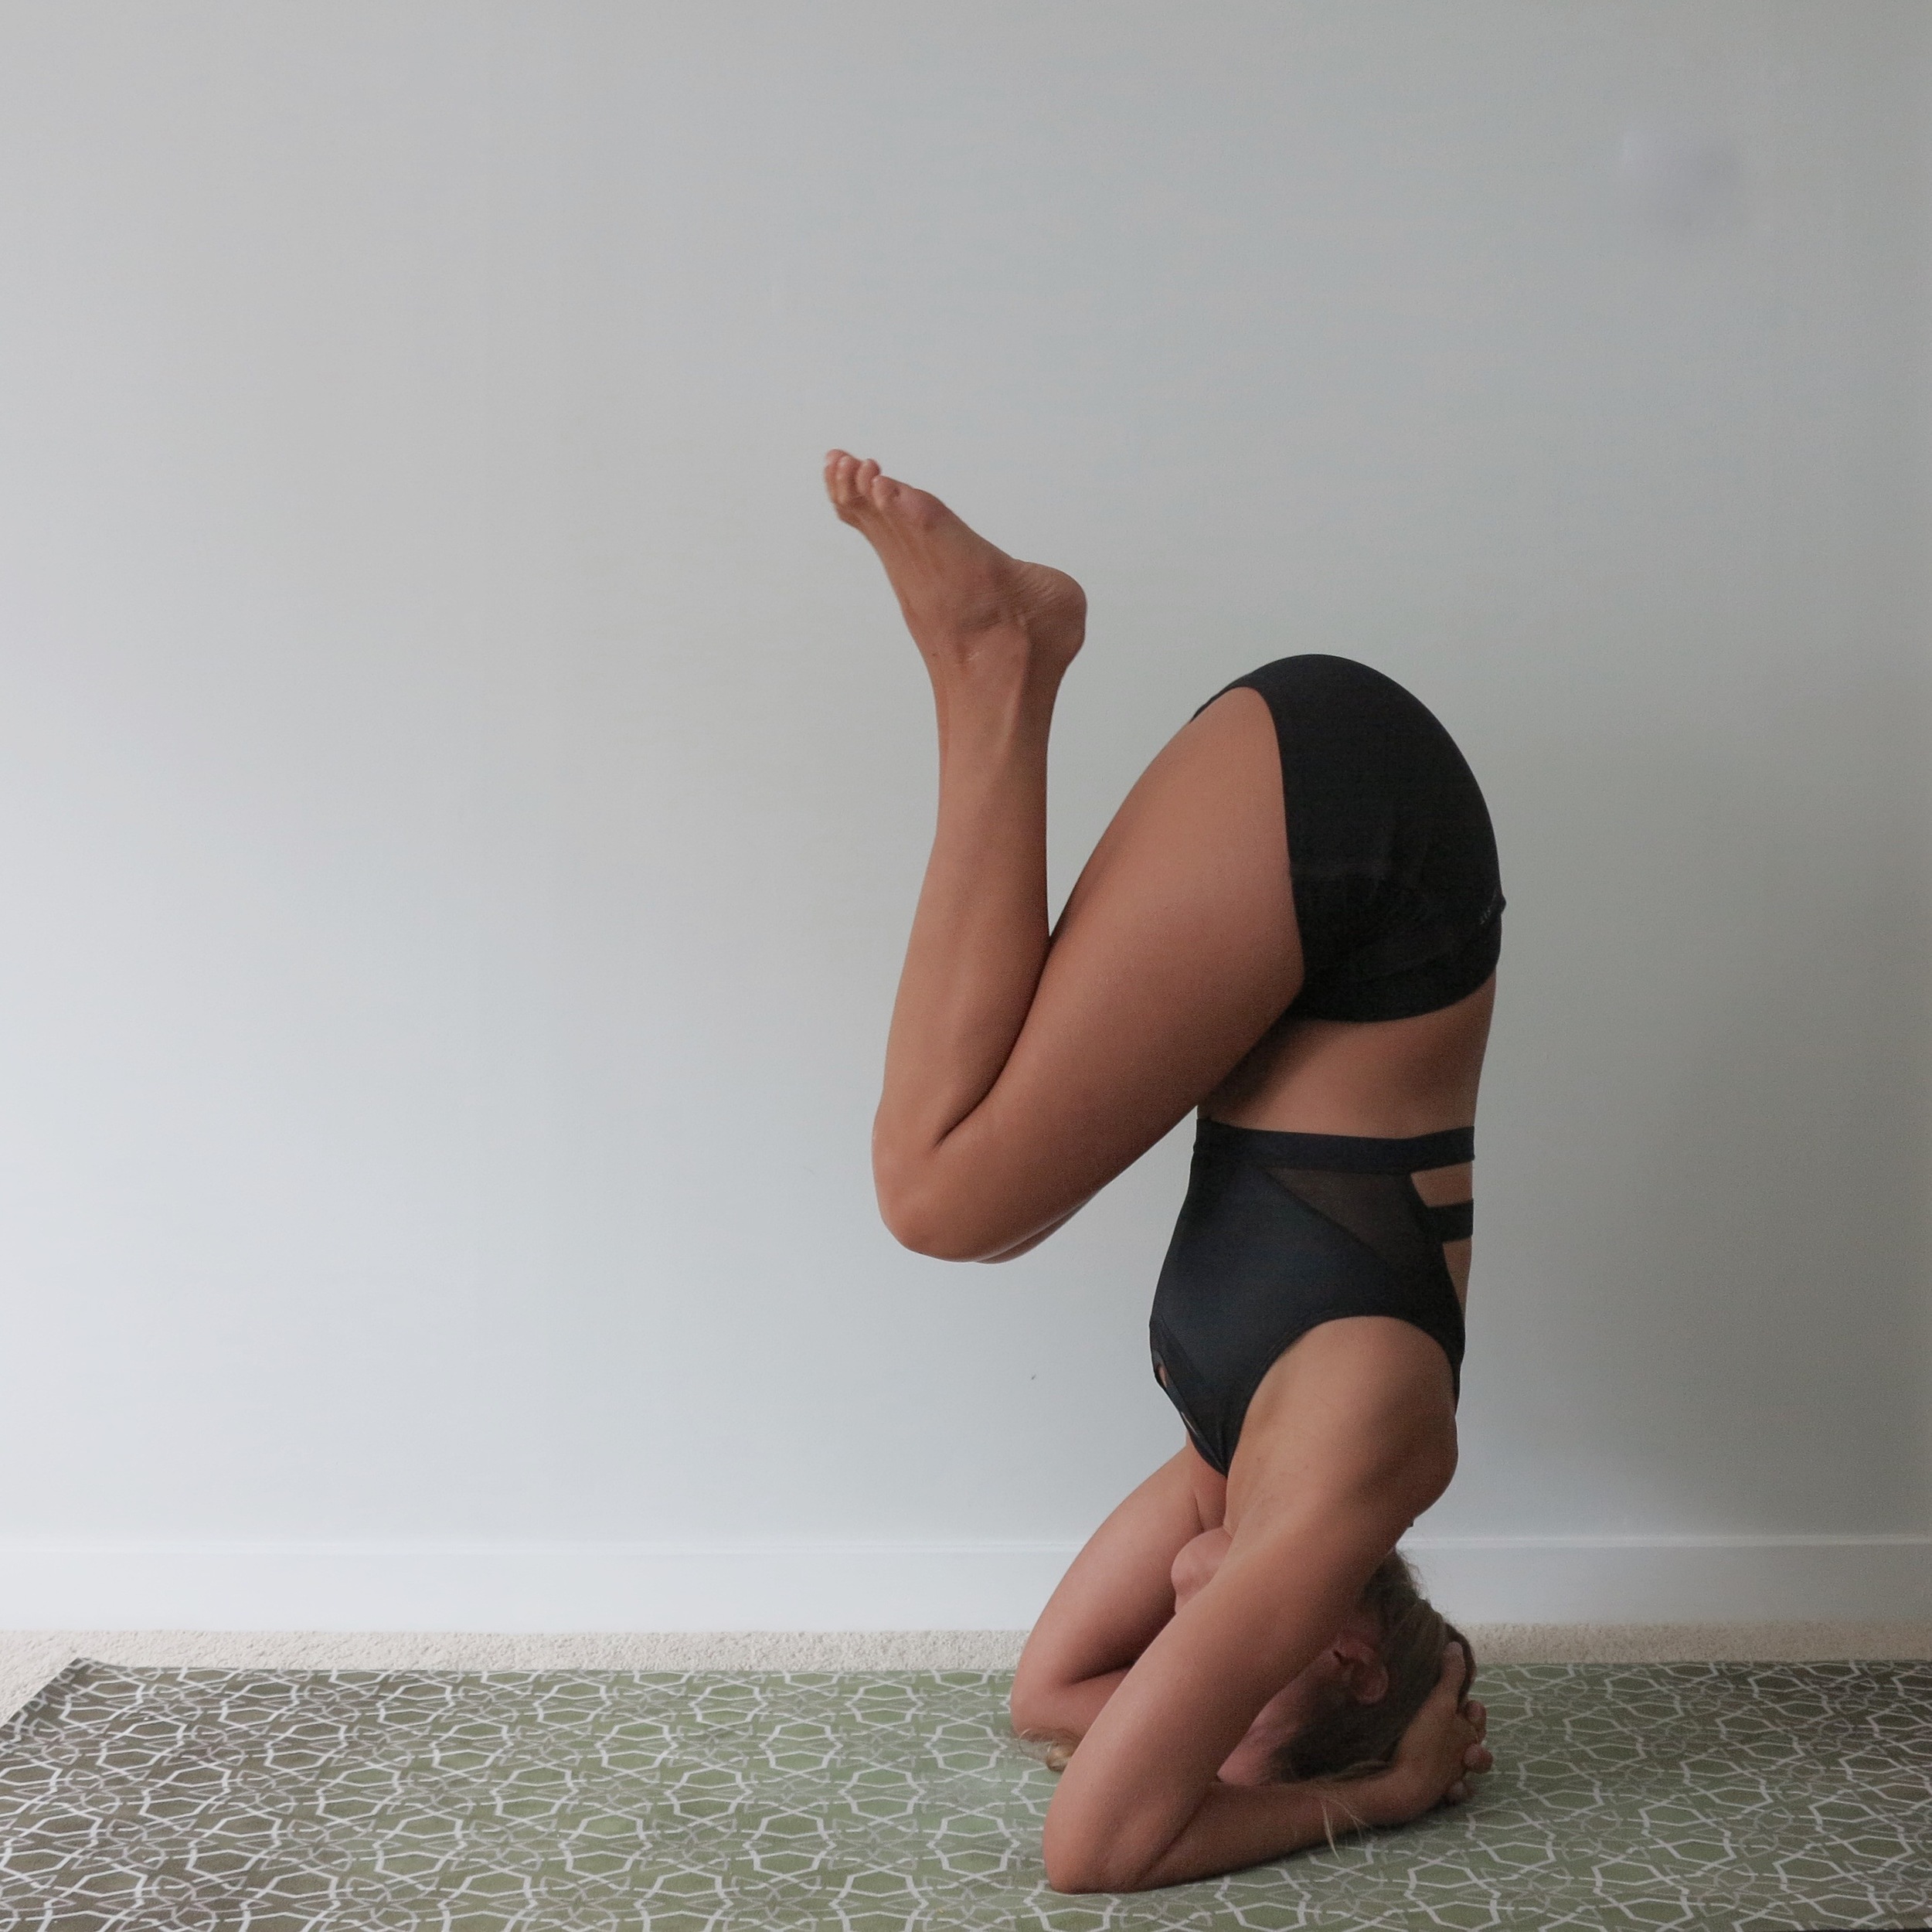
6. Be weightless
This is absolutely crucial to ensuring that you don’t injure your neck or your shoulders. Once you know your foundations and you’ve stopped to take notice and to focus on using the correct muscles and alignment in your headstand prep positions then it's time to lift those toes towards the sky.
Imagine that you are lifting up, not pushing down. The lighter you feel the easier it will be to keep your legs steady, your mind controlled and your breath equal. Try to imagine that a string is tied around your little toe and you are hanging from the sky.
Feel light, be light.
7. Gracefully touch down
I’ve mentioned in my step by step guide below to ‘exit as you entered’ and this in itself requires strength and balance.
Matthew Sweeney taught me that one of the most important parts of an inversion (whether it be a headstand, handstand or forearm balance) is exiting slowly and with ease rather than thudding your legs to the ground.
He suggested that if you can master a slow exit from an inversion than you have built enough strength and coordination to improve your entry into the asana and that it was ok to practice throwing your legs at the wall as long as you are practicing a smooth and slow exit from the posture as you come down.
So if you’re struggling with your entrance into the posture, take some time to practice against a wall and master your slow exit – try one leg at a time and shifting the weight of your pelvis so that it counterbalances the weight of your leg or come back through your 2 leg tuck (Step 8) then extend one or both legs to the ground.
8. Stay low at the end
This is something I see all too often, and even when I try to be very clear as a teacher that you should stay low afterwards the excitement of achieving a headstand often takes over and my students sit up straight – potentially feeling lightheaded and a rush of blood to the head.
I must stress, always, always keep your head low at the end of an inversion - a minimum of 5 breaths if you can.
9. Practice makes perfect
We often avoid postures that we know we can’t do right now or those that we find difficult or unnatural which is exactly why we should practice them. No one will ever achieve greatness or expertise in something without practice. Practice, practice, practice…
I know it’s not easy to practice every single day and I would suggest a small warm up before practicing your headstands or any inversion / arm balance as you want to be focussed, you want your muscles to be warm and activated and you want to have your head in the game before you start throwing your legs up into the sky, but the sooner you start a regular practice the sooner you will start to notice improvement and start to achieve your personal yoga goals (stay tuned for my workshops in Brisbane and the Sunshine Coast on how to create your own home yoga practice). Creating a home practice gives you the time and the head space to practice without embarrassment or the fear of falling on top of someone else in class and will help you to achieve your 'studio' goals much quicker even if you only spend 10 minutes a day moving through your own sequence of postures.
So here’s what I propose…
Each day for the next 3 days I want you to try each of these steps and only these steps. Even if you can already practice a headstand it is important to come back to your roots every now and then and take the time to work through your foundations before taking your practice further.
If you can, take some pictures of your progress and each step so that you can use them for guidance and feedback and make sure to #masteringmyheadstand so that I can see your progress.
Happy Headstanding everyone!!

Step 1: Take hold of your elbows with the opposite hand. This is the distance that your elbows should be apart (shoulder distance) when you place your forearms on the ground. If that distance is unattainable for you it could be the shape of your bones, which is fine, simply modify to find the distance that works for you.
Step 4: Place the top of your head on the ground and cradle the back of your head in your bound hands
Step 5: Before you start to lift your hips take a moment to check your shoulder joint stability. Make sure your shoulders are away from your ears and practice getting the feeling of pushing through your forearms on the ground (not the top of your head). See my ‘What-not-to-do’ picture below.

Step 6: Lift your hips to the sky, it’s all in the hips for this part. Actively pull your belly button into your spine so that you are using your abdominal muscles for support, stop here to check where you are holding your weight, push through your forearms to ensure your weight isn’t solely on your hands and head.
Step 8: Once you know the feeling of ‘stacking’ your hips on top of your torso you can start to experiment with lifting both feet off the ground into a headstand tuck. Practice using your abdominals to lift your hips and tucked legs up, taking your knees away from your chest and then bringing them back to your chest again, almost like doing a crunch. Stop for a moment here and check your arm support – press through the ground with your forearms and try to lift the top of your head off the ground. If you can do this you know that you are activating the right muscles around your shoulder join (rather than your neck) as your foundation for your headstand.

Step 2: Place your hands wrapped around your elbows on the ground, keep your elbows in position and open your forearms forward on the ground, bind your fingers together.
Step 3: Keeping your arms where they are, open your hands, keeping your fingers bound to allow space to put the back of your head in your hands.

WHAT NOT TO DO - this scrunching of the shoulders does not create greater shoulder joint stability, in fact it decreases the range of movement from your shoulders and encourages you to use your head and neck which you DO NOT want to do.
Create space between your shoulders and neck and imagine that you are pulling your arms into your shoulder socket, activate all of the muscles surrounding your shoulder girdle WITHOUT using the muscles in the neck (think arm pits, rib cage, triceps, biceps, chest).

Step 7: Start to tuck one knee at a time towards your chest keeping your hips lifting towards the sky. Start by trying one leg at a time and walking the toes that a re still on the ground closer to your face. You will start to get thefeeling of lifting through your hips and tilting your pelvis upwards so that they ‘stack’ on top of your torso.

Step 9: Find a focus point in your headstand tuck, and while you are concentrating your gaze on that point slowly lift through your legs taking your toes towards the sky. Do this slowly, try to keep your legs together as extending one leg before the other may throw you off balance. Squeeze your thighs together and imagine that you are lifting up through your shoulders. You can point your toes to the sky or push through your heels – this will work differently for everyone. Check again whether you are using your arms or your head to hold your body weight, keep your ribs tucked in, pull your belly button into your spine for stability and try to hold for 10 long breaths
Step 10: Release your headstand the same way you got into it, knees tucked back down then straightening 1 leg at a time down to the ground. Make sure to move into childs pose / keep your head low for at least 5 deep breaths before you sit up to allow your blood pressure to equalize.